How to create a JPanel in Java
In our previous post, we learned how to create a JButton and JFrame. A JFrame is a container that holds components whereas a JButton is a component that needs to be added to a container such as JFrame. The JPanel component is also a container holding different components. Based on the official javadoc of JPanel, it is a generic lightweight container. In this tutorial, you will learn how you can create a JPanel in Java.
Creating a JPanel in Java Example
package com.javapointers.javase;

import java.awt.Color;
import java.awt.Dimension;
import java.awt.FlowLayout;
import java.awt.event.ActionEvent;
import java.awt.event.ActionListener;
import javax.swing.JButton;
import javax.swing.JFrame;
import javax.swing.JPanel;

public class JButtonTest implements ActionListener {

    JFrame frame;
    JButton button;
    JPanel panel;

    public JButtonTest() {
        frame = new JFrame();
        frame.setTitle("My JFrame");
        frame.setSize(500, 400);
        frame.setDefaultCloseOperation(JFrame.EXIT_ON_CLOSE);

        button = new JButton("Click Me!");
        button.addActionListener(this);

        panel = new JPanel();
        panel.setLayout(new FlowLayout());
        panel.add(button);

        frame.add(panel);
        frame.setVisible(true);
    }

    @Override
    public void actionPerformed(ActionEvent e) {
        System.out.println("You have click the button");
    }

    public static void main(String args[]) {
        JButtonTest test = new JButtonTest();
    }
}
This is the same example in our JButton tutorial with little modifications. In this example, we have created our frame, button, and our panel. The button was placed inside the panel, and the panel was placed inside the frame. JPanel works like our JFrame.
We can also add multiple JPanels inside our JFrame. Try this:
package com.javapointers.javase;

import java.awt.Color;
import java.awt.Dimension;
import java.awt.FlowLayout;
import java.awt.event.ActionEvent;
import java.awt.event.ActionListener;
import javax.swing.JButton;
import javax.swing.JFrame;
import javax.swing.JPanel;

public class JButtonTest {

    JFrame frame;
    JPanel firstPanel, secondPanel;

    public JButtonTest() {
        frame = new JFrame();
        frame.setTitle("My JFrame");
        frame.setDefaultCloseOperation(JFrame.EXIT_ON_CLOSE);

        firstPanel = new JPanel();
        firstPanel.setPreferredSize(new Dimension(250, 400));
        firstPanel.setBackground(Color.BLUE);

        secondPanel = new JPanel();
        secondPanel.setPreferredSize(new Dimension(250, 400));
        secondPanel.setBackground(Color.RED);

        frame.setLayout(new FlowLayout());
        frame.add(firstPanel);
        frame.add(secondPanel);
        frame.pack();
        frame.setVisible(true);
    }

    public static void main(String args[]) {
        JButtonTest test = new JButtonTest();
    }
}
When we run the program, it should show like this:
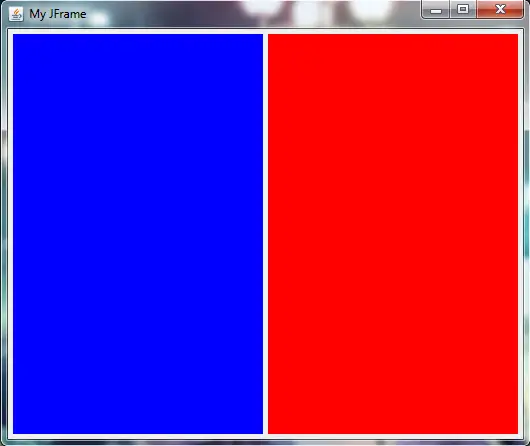
Explanation:
We have created two panels and a frame. The two panels have been added to our frame.
-
firstPanel = new JPanel()
– create an instance of JPanel.
-
firstPanel.setPreferredSize(new Dimension(250, 400))
– set the size of our panels to 250 in width, 400 in height.
-
firstPanel.setBackground(Color.BLUE);
– set the background of our panel to the color blue.
-
frame.setLayout(new FlowLayout())
– set the layout of the frame to flow layout. You will learn more about the layout manager later in the next chapter.
-
frame.add(firstPanel)
– add our panel to the frame.
-
frame.pack()
– sets the size of our frame relative to the overall size of whatever components inside the frame.
Now that we learned how to create a jpanel in java, next in our tutorial is about Layout Managers. If you noticed from our above example, we use a Layout Manager to determine the location of each component.