How to create JButton in Java
In our previous post, we learned how to create a JFrame in Java. In this article, we will learn how we can create a JButton in java and add it to our JFrame.
The JButton is the class that is used to create a button in a JavaSE application. Use JButton to send actions to your application whenever a user interacts with the button by either clicking, hovering, etc.
Based on the official JavaDocs, a JButton is the actual implementation of a “push” button. It can be configured, and to some degree controlled, by Actions. Using an Action with a button has many benefits beyond directly configuring a button.
Creating a Jbutton in Java Example
package com.javapointers.javase;

import java.awt.FlowLayout;
import java.awt.event.ActionEvent;
import java.awt.event.ActionListener;
import javax.swing.JButton;
import javax.swing.JFrame;

/**
 *
 * @author javapointers
 */
public class JButtonTest implements ActionListener {
    JFrame frame;
    JButton button;

    public JButtonTest() {
        frame = new JFrame();
        frame.setTitle("My JFrame");
        frame.setSize(500, 400);
        frame.setDefaultCloseOperation(JFrame.EXIT_ON_CLOSE);

        button = new JButton("Click Me!");
        button.addActionListener(this);

        frame.setLayout(new FlowLayout());
        frame.add(button);
        frame.setVisible(true);
    }

    @Override
    public void actionPerformed(ActionEvent e) {
        System.out.println("You have clicked the button");
    }

    public static void main(String args[]){
        JButtonTest test = new JButtonTest();
    }
}
When we run the program, it will show our JFrame with its JButton:
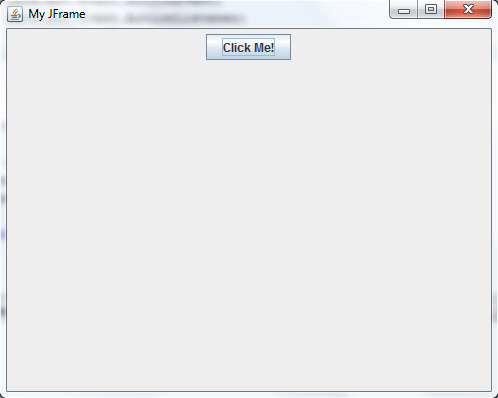
and when the user clicks on the button, the string “You have clicked the button” will be displayed in the console.
Explanation:
- import javax.swing.JButton – import the JButton class to be able to use it.
- button = new JButton(“Click Me!”) – Create a new instance of JButton with label Click Me!
- button.addActionListener(this) – Adds action when the user clicks the button.
- frame.setLayout(new FlowLayout()) – Define how java will layout your components. You will learn more about layout manager later on this tutorial.
- frame.add(button) – add the button to the frame.
- public void actionPerformed(ActionEvent e) – the method that will be called when the user clicks the button.
Now that we have learned how to create a JButton in Java, our next topic will be on how we can create a JPanel in Java that can hold other components including the JButton that we just discussed.