How to compress files in ZIP in Java
Previously in our tutorial, we learned how we can compress files in GZIP in Java. Today, we will be showing you how you can compress files in ZIP in Java. This will be using the Java API and will not use any external libraries.
Compress Files in ZIP in Java
We will be using the ZipOutputStream in Java to copy each files. Here’s the sample code:
    public static void compressZIP(Path outputFile, Path... filesToZip) throws IOException {
        try (ZipOutputStream zipOutputStream = new ZipOutputStream(Files.newOutputStream(outputFile))) {
            for (Path file : filesToZip) {
                ZipEntry zipEntry = new ZipEntry(file.getFileName().toString());
                zipOutputStream.putNextEntry(zipEntry);
                Files.copy(file, zipOutputStream);
            }
        }
    }
In our above code, each file or path will create a new ZipEntry object in our ZipOutputStream. The ZipEntry contains the filename of the file that we are adding. Then we add it and copy the file to the ZipOutputStream.
For example, we wanted to zip the pom.xml file and the .iml file in our project directory and add it to the test.zip. To test this, we can easily call this method similar to below.
compressZIP(Paths.get("test.zip"), Paths.get("pom.xml"), Paths.get("compress-file-example.iml"));
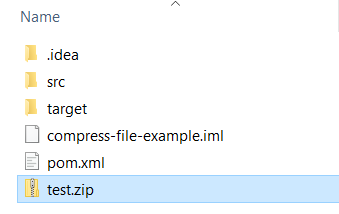
Running this code will create the zip file in our project directory:
Decompressing ZIP in Java
To decompress a zip file, we just need to use the ZipInputStream in Java and iterate each ZipEntry and save it to our destination folder. Here’s the sample code:
    public static void decompressZIP(Path zipFile, Path outputDir) throws IOException {
        try (ZipInputStream zipInputStream = new ZipInputStream(Files.newInputStream(zipFile))) {
            ZipEntry entry;
            while((entry = zipInputStream.getNextEntry()) != null) {
                Path outputFile = outputDir.resolve(entry.getName()); //save to output directory
                Files.copy(zipInputStream, outputFile);
            }
            zipInputStream.closeEntry();
        }
    }
As you can see in the above code, we create a new ZipInputStream using the zip file, then we iterate each entry found in the stream and then save it. Finally, we close the entry and the input stream.
To test this, if we wanted to unzip the previously created test.zip file, we can easily create first a destination folder and call this method. Here’s how you can do it:
        Files.createDirectory(Paths.get("zip"));
        decompressZIP(Paths.get("test.zip"), Paths.get("zip"));
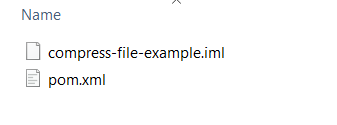
And running this code will create a zip folder in our project directory and save all the files found in the test.zip file. The contents of our zip folder are our pom.xml and .iml files.
That’s it! We learned how we can easily zip and unzip files in Java with adding any new libraries or dependencies. Let us know in the comments section if this helps you in your project.