Add Liquibase to Spring Boot Example
This tutorial will show you how you can easily add Liquibase to your Spring Boot Application. Liquibase is an open-source database change management solution that allows you to easily change or update your existing schema. Let’s see how we can add Liquibase to Spring Boot Application with our example below.
Add Spring Boot JDBC Dependency
Firstly, we will add the Spring Boot JDBC in our pom.xml. It will help us to auto-detect the configurations and automatically creates the Data Source for us.
    <parent>
        <groupId>org.springframework.boot</groupId>
        <artifactId>spring-boot-starter-parent</artifactId>
        <version>2.2.2.RELEASE</version>
        <relativePath/>
    </parent>

    <dependencies>
        <dependency>
            <groupId>org.springframework.boot</groupId>
            <artifactId>spring-boot-starter-jdbc</artifactId>
        </dependency>

        <!-- logs liquibase -->
        <dependency>
            <groupId>com.mattbertolini</groupId>
            <artifactId>liquibase-slf4j</artifactId>
            <version>1.2.1</version>
        </dependency>

        <!-- database connectors -->
        <!-- here, we added both derby and mysql -->
        <!-- just remove the one that you don't need -->
        <dependency>
            <groupId>org.apache.derby</groupId>
            <artifactId>derby</artifactId>
        </dependency>
        <dependency>
            <groupId>mysql</groupId>
            <artifactId>mysql-connector-java</artifactId>
        </dependency>

    </dependencies>
From the above configuration, we added Spring Boot JDBC, DB Library, and Liquibase Logging.
Spring Boot JDBC will check for any configurations in your application.properties file.
Next, it will load the driver class. It will use the URL to determine the required driver.
Lastly, we added Liquibase SLF4J logging to check our console for any Liquibase related logs.
Add the configurations in the application.properties
In Spring Boot 2.x, the keys changed from datasource to spring.datasource.
spring.liquibase.change-log=classpath:db/db.changelog.xml

spring.datasource.url=jdbc:derby:javapointers;create=true
spring.datasource.username=jpliquibase
spring.datasource.password=

spring.jpa.generate-ddl=true
spring.jpa.hibernate.ddl-auto=update
The spring.liquibase.change-log allows us to set the location of our changelogs.
And the spring.datasource.url is where you will add your database URL. For this example, we are using an Embedded Derby DB.
Creating the Change Logs
Next, let’s create the changelogs of our database. Initially, we will be creating a database from scratch. In our application.properties, we have defined that the changelog will be stored in db/db.changelog.xml. So let’s create that file in our resources folder.
Here’s the content of our db.changelog.xml.
<?xml version="1.0" encoding="UTF-8"?>
<databaseChangeLog
        xmlns="http://www.liquibase.org/xml/ns/dbchangelog"
        xmlns:xsi="http://www.w3.org/2001/XMLSchema-instance"
        xsi:schemaLocation="http://www.liquibase.org/xml/ns/dbchangelog
                      http://www.liquibase.org/xml/ns/dbchangelog/dbchangelog-2.0.xsd">

    <include relativeToChangelogFile="true" file="db.changelog-1.0.xml"/>
</databaseChangeLog>
This file contains the master change logs and will contain the path for every changelog that we will be creating. At first, we only have one changelog. Here are the contents of our db.changelog-1.0.xml.
<?xml version="1.0" encoding="UTF-8"?>
<databaseChangeLog
        xmlns="http://www.liquibase.org/xml/ns/dbchangelog"
        xmlns:xsi="http://www.w3.org/2001/XMLSchema-instance"
        xsi:schemaLocation="http://www.liquibase.org/xml/ns/dbchangelog
                      http://www.liquibase.org/xml/ns/dbchangelog/dbchangelog-2.0.xsd">

    <changeSet author="JavaPointers" id="changelog-1.0">
        <createTable tableName="login_history">
            <column name="id" type="int" autoIncrement="true" incrementBy="1">
                <constraints primaryKey="true" nullable="false"/>
            </column>
            <column name="username" type="VARCHAR(255)">
                <constraints nullable="false"/>
            </column>
            <column name="login_time" type="timestamp">
                <constraints nullable="false"/>
            </column>
        </createTable>
    </changeSet>
</databaseChangeLog>
The above changes will automatically create a table and add the columns specified.
To test this, we will be creating the Main class and run the program. Here’s our Application.java file.
import org.springframework.boot.SpringApplication;
import org.springframework.boot.autoconfigure.SpringBootApplication;

@SpringBootApplication
public class Application {

    public static void main(String... args) {
        SpringApplication.run(Application.class, args);
    }
}
And running our application should log some Liquibase outputs.
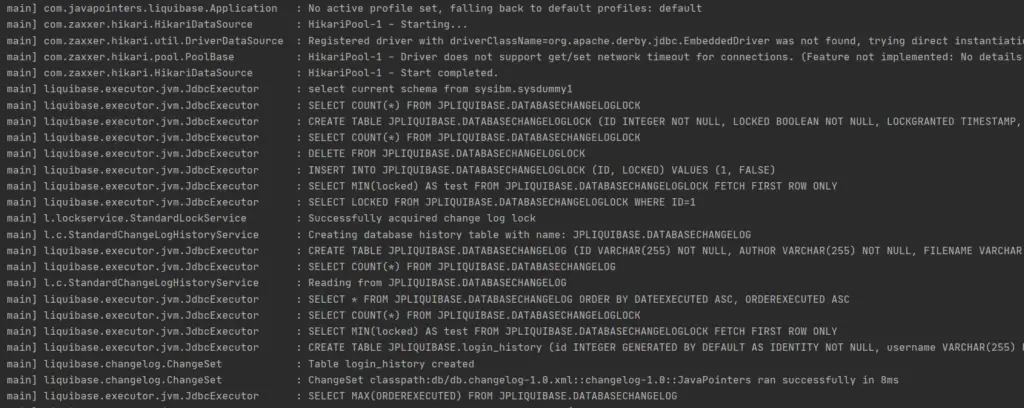
Let us browse the database and see if the table was created using Squirrel.
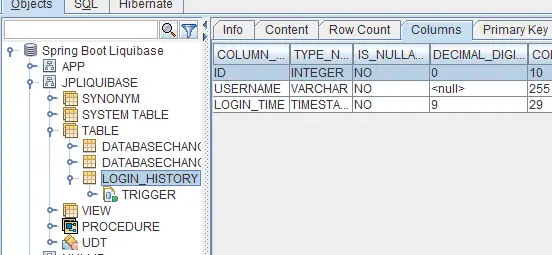
To check how easily we can change the schema, let’s try to add a new column in our table.
We will be creating a new changelog that creates a new column. Here is our db.changelog-1.1.xml.
<?xml version="1.0" encoding="UTF-8"?>
<databaseChangeLog
        xmlns="http://www.liquibase.org/xml/ns/dbchangelog"
        xmlns:xsi="http://www.w3.org/2001/XMLSchema-instance"
        xsi:schemaLocation="http://www.liquibase.org/xml/ns/dbchangelog
                      http://www.liquibase.org/xml/ns/dbchangelog/dbchangelog-2.0.xsd">

    <changeSet author="JavaPointers" id="changelog-1.1">
        <addColumn tableName="login_history">
            <column name="login_ip" type="VARCHAR(20)" />
        </addColumn>
    </changeSet>
</databaseChangeLog>
Next, we will add this to our master changelog file. In our db.changelog.xml, create a new entry for the 1.1 changelogs. Here is our updated master changelog.
<?xml version="1.0" encoding="UTF-8"?>
<databaseChangeLog
        xmlns="http://www.liquibase.org/xml/ns/dbchangelog"
        xmlns:xsi="http://www.w3.org/2001/XMLSchema-instance"
        xsi:schemaLocation="http://www.liquibase.org/xml/ns/dbchangelog
                      http://www.liquibase.org/xml/ns/dbchangelog/dbchangelog-2.0.xsd">

    <include relativeToChangelogFile="true" file="db.changelog-1.0.xml"/>
    <include relativeToChangelogFile="true" file="db.changelog-1.1.xml"/>
</databaseChangeLog>
Finally, let’s run again our Spring Boot Application and check the table in Squirrel.
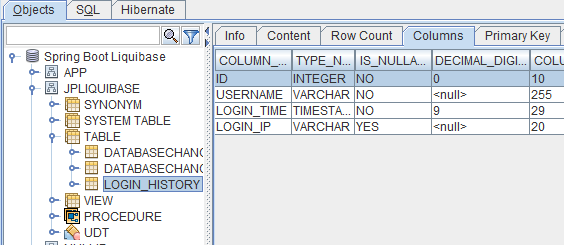
As you can see, our new column was automatically added to our existing table.
That’s it for this guide. Let us know in the comments if this guide helps you.