Cucumber Selenium Java Example
In our previous post, we discussed about how to use Cucumber and Selenium in Java. Today, we will create a simple Cucumber Selenium Java example that combines both the BDD framework from Cucumber and Automation from Selenium. This example automates opening the browser and search. Before following this tutorial, make sure that you have knowledge in Selenium and Cucumber. You can check our articles for these topics here:
Creating a Simple Cucumber Selenium Java Example
First, create a Maven project. Refer to this tutorial on how to create one.
Next, edit your pom.xml and add the dependencies for Cucumber and Selenium:
        <dependency>
            <groupId>io.cucumber</groupId>
            <artifactId>cucumber-java</artifactId>
            <version>4.4.0</version>
            <scope>test</scope>
        </dependency>
        <dependency>
            <groupId>io.cucumber</groupId>
            <artifactId>cucumber-junit</artifactId>
            <version>4.4.0</version>
            <scope>test</scope>
        </dependency>
        <dependency>
            <groupId>org.seleniumhq.selenium</groupId>
            <artifactId>selenium-java</artifactId>
            <version>3.4.0</version>
        </dependency>
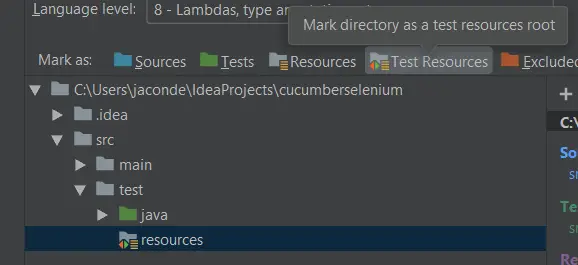
Expand the project structure and create a resources folder under test folder. Then go to File > Project Structure > Modules and select the newly created folder. Click the test resources button above to mark it as our test resources folder.
Create search.feature file under test resources folder. In this section, we will define our Scenario. For example, here’s the content of our search.feature:
Feature: Search in Google

  Scenario: Search Cucumber Selenium JavaPointers Tutorial
    When I go to "https://google.com"
    And I type "cucumber selenium javapointers tutorial"
    And I hit Enter
    Then I should be shown the results from my query
Then we need to define our Step Definition in a Class. Here, we create SearchStepDef class inside com.javapointers.step package. We also added our Selenium code on how it will automate our browser. Below is the content of our class file:
package com.javapointers.step;

import com.javapointers.selenium.SeleniumUtil;
import cucumber.api.java.en.And;
import cucumber.api.java.en.Then;
import cucumber.api.java.en.When;
import org.openqa.selenium.*;

import java.net.URISyntaxException;

public class SearchStepDef {

    private WebDriver webDriver;

    @When("I go to {string}")
    public void iGoTo(String url) throws URISyntaxException {
        webDriver = SeleniumUtil.getWebDriver();
        webDriver.get(url);
    }

    @And("I type {string}")
    public void iType(String searchQuery) {
        webDriver.findElement(By.name("q")).sendKeys(searchQuery);
    }

    @And("I hit Enter")
    public void iHitEnter() {
        webDriver.findElement(By.name("q")).sendKeys(Keys.ENTER);
    }

    @Then("I should be shown the results from my query")
    public void iShouldBeShownTheResultsFromMyQuery() {
        try {
            webDriver.findElement(By.xpath("//*[contains(text(), 'Search Results')]"));
        } catch (NoSuchElementException e) {
            throw new AssertionError("Result Page not displayed");
        }
        webDriver.quit();
    }
}
Take note from the code above, that we use a class SeleniumUtil to get the instance of Web Driver. This class checks first if Web Driver is already initialized before returning the instance. Else, it will first create the web driver. We also added synchronized keyword in our method to only allow one thread at a time to enter our method. In that manner, we can make sure that there will be 1 instance of Web Driver through out our test. Below is the code for our SeleniumUtil class. It is located inside com.javapointers.selenium package:
package com.javapointers.selenium;

import org.openqa.selenium.WebDriver;
import org.openqa.selenium.chrome.ChromeDriver;

import java.net.URISyntaxException;
import java.net.URL;
import java.nio.file.Paths;

public class SeleniumUtil {

    private static WebDriver webDriver;

    public static synchronized WebDriver getWebDriver() throws URISyntaxException {
        if (webDriver == null) {
            initialize();
        }
        return webDriver;
    }

    private static void initialize() throws URISyntaxException {
        URL chromeURL = SeleniumUtil.class.getClassLoader().getResource("chromedriver.exe");
        System.setProperty("webdriver.chrome.driver", Paths.get(chromeURL.toURI()).toFile().getAbsolutePath());

        webDriver = new ChromeDriver();
    }
}
Next, we make sure that our driver is located inside our test resources folder. For simplicity, we uses Google Chrome browser, thus, we downloaded the chromedriver.exe that corresponds to our Chrome version.
Finally, we can now run our code by right clicking the feature file and select Run. This should automatically opens a Chrome browser, do a search and verifies that it displays the Result page.