How to Use Redis in Java using Jedis
There are multiple clients on how to use redis in Java. In this tutorial, we will be using Jedis, a simple, fast redis java client. We will also be using Maven as our build tool, otherwise you can just import the jar file of jedis in your project. Also, this assumes that you have already redis server installed, if not, visit this link on how to configure one.
1.Add Jedis Dependency to Use Redis
We need to add jedis dependency in our pom.xml to use jedis. In your pom.xml, under Dependencies section, add
    <groupId>redis.clients</groupId>
    <artifactId>jedis</artifactId>
    2.4.2
2.Create a Sample Class
This is a simple Java Class. It uses Redis SET and HASH commands. You can learn different commands in Redis in their website.
JedisMain.java
import redis.clients.jedis.Jedis;
import redis.clients.jedis.JedisPool;
import redis.clients.jedis.exceptions.JedisException;

import java.util.HashMap;
import java.util.Map;
import java.util.Set;

public class JedisMain {

    //address of your redis server
    private static final String redisHost = "localhost";
    private static final Integer redisPort = 6379;

    //the jedis connection pool..
    private static JedisPool pool = null;

    public JedisMain() {
        //configure our pool connection
        pool = new JedisPool(redisHost, redisPort);

    }

    public void addSets() {
        //let us first add some data in our redis server using Redis SET.
        String key = "members";
        String member1 = "Sedarius";
        String member2 = "Richard";
        String member3 = "Joe";

        //get a jedis connection jedis connection pool
        Jedis jedis = pool.getResource();
        try {
            //save to redis
            jedis.sadd(key, member1, member2, member3);

            //after saving the data, lets retrieve them to be sure that it has really added in redis
            Set members = jedis.smembers(key);
            for (String member : members) {
                System.out.println(member);
            }
        } catch (JedisException e) {
            //if something wrong happen, return it back to the pool
            if (null != jedis) {
                pool.returnBrokenResource(jedis);
                jedis = null;
            }
        } finally {
            ///it's important to return the Jedis instance to the pool once you've finished using it
            if (null != jedis)
                pool.returnResource(jedis);
        }
    }

    public void addHash() {
        //add some values in Redis HASH
        String key = "javapointers";
        Map<String, String> map = new HashMap<>();
        map.put("name", "Java Pointers");
        map.put("domain", "www.javapointers.com");
        map.put("description", "Learn how to program in Java");

        Jedis jedis = pool.getResource();
        try {
            //save to redis
            jedis.hmset(key, map);

            //after saving the data, lets retrieve them to be sure that it has really added in redis
            Map<String, String> retrieveMap = jedis.hgetAll(key);
            for (String keyMap : retrieveMap.keySet()) {
                System.out.println(keyMap + " " + retrieveMap.get(keyMap));
            }

        } catch (JedisException e) {
            //if something wrong happen, return it back to the pool
            if (null != jedis) {
                pool.returnBrokenResource(jedis);
                jedis = null;
            }
        } finally {
            ///it's important to return the Jedis instance to the pool once you've finished using it
            if (null != jedis)
                pool.returnResource(jedis);
        }
    }

    public static void main(String[] args){
        JedisMain main = new JedisMain();
        main.addSets();
        main.addHash();
    }
}
3. Running Main Method
Run the class file and it should print the following values:
Joe
Sedarius
Richard
domain www.javapointers.com
name Java Pointers
description Learn how to program in Java
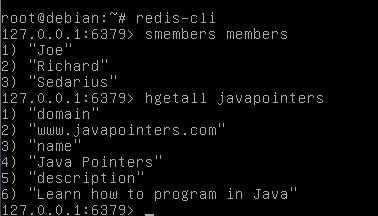
Verifying this in our Redis Server to make sure that it really saves the data