Spring MVC Form Validation
In this example, we will be creating a simple web project that will validate the registration form using JSR 303 or java validators with the use of hibernate and spring.
Spring MVC Form Validation Example
-
Configure pom.xml
Add validator dependencies
<groupId>javax.validation</groupId> <artifactId>validation-api</artifactId> 1.1.0.Final <groupId>org.hibernate</groupId> <artifactId>hibernate-validator</artifactId> 5.1.2.Final -
Configure your spring context
Edit your dispatcher-servlet.xml or your spring context and add this bean:
And in your mvc:annotation-driven add the validator attribute:
<mvc:annotation-driven validator="validator" />
-
Create DTO object
Next we create the Registration Data Transfer Object that will be passed to our jsp.
public class RegistrationDto {

    @NotEmpty
    private String username;

    @NotEmpty
    private String email;

    @Size(min = 5, max = 15)
    private String password;

    @Size(min = 5, max = 15)
    private String confirmPassword;

    public String getEmail() {
        return email;
    }

    public void setEmail(String email) {
        this.email = email;
    }

    public String getConfirmPassword() {
        return confirmPassword;
    }

    public void setConfirmPassword(String confirmPassword) {
        this.confirmPassword = confirmPassword;
    }

    public String getUsername() {
        return username;
    }

    public void setUsername(String username) {
        this.username = username;
    }

    public String getPassword() {
        return password;
    }

    public void setPassword(String password) {
        this.password = password;
    }
}
We have added @NotNull and @Size validators.
-
Create the Controller
Create the controller that will handle the spring mvc form validation.
@Controller
public class RegistrationController {
    public static final String REGISRATION_FORM = "reg_form";

    @RequestMapping(value = "/register", method = RequestMethod.GET)
    public String viewRegistration(ModelMap modelMap) {
        modelMap.addAttribute(REGISRATION_FORM, new RegistrationDto());
        return "registration/register";
    }

    @RequestMapping(value = "/register", method = RequestMethod.POST)
    public String registerUser(@ModelAttribute(REGISRATION_FORM) @Valid RegistrationDto registrationDto,
                               BindingResult result) {
        if(result.hasErrors()) {
            return "registration/register";
        }
        return "registration/reg-success";
    }
}
Take note that we uses the annotation @ModelAttribute and the @Valid and also add BindingResult in the parameter.
The @ModelAttribute will map the reg_form to RegistrationDto object.
The @Valid will perform the validation to the object based on their annotations(@NotEmpty, @Size)
The validation results will be saved in BindingResult object. -
Create JSP
Next we create registration.jsp that will contain the form. This also uses the form tag library.
Add the form tld at the top of your jsp file:<%@ taglib prefix="form" uri="http://www.springframework.org/tags/form"%>
And create the form inside your html body.
The modelAttribute should be the same as the one typed in the controller<form:form id="register-form" modelAttribute="reg_form" method="post" role="form"> <div class="form-group"> <form:errors path="username" class="error" /> <form:input type="text" path="username" id="username" tabindex="1" class="form-control" placeholder="Username" /> </div> <div class="form-group"> <form:input type="email" path="email" id="email" tabindex="1" class="form-control" placeholder="Email Address" /> </div> <div class="form-group"> <form:input type="password" path="password" id="password" tabindex="2" class="form-control" placeholder="Password" /> </div> <div class="form-group"> <form:input type="password" path="confirmPassword" id="confirm-password" tabindex="2" class="form-control" placeholder="Confirm Password" /> </div> <div class="form-group"> <div class="row"> <div class="col-sm-6 col-sm-offset-3"> <input type="submit" name="register-submit" id="register-submit" tabindex="4" class="form-control btn btn-register" value="Register Now" /> </div> </div> </div> </form:form> -
Testing Validations
The registration page:

registration.jsp
When we try to submit with invalid data:
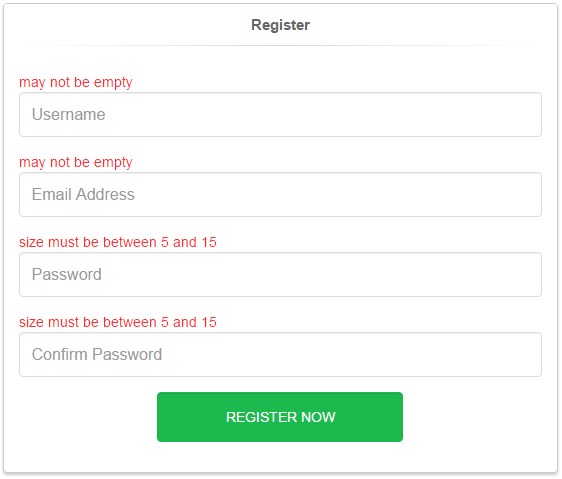
invalid registration data
Adding valid data in registration form will display the success page.