Maven Building Different Environments

Supposedly you have created a web project that you need to upload to your test server from time to time. Since you’re working on your local machine, the environment on your machine is different like the password in your database, the file paths and more. With using maven, you don’t need to edit your configuration files whenever you’re building for a different environments. You can just define a new profile in your pom.xml and use that profile when building.

In this tutorial, we will be creating a webapp project which uses maven as its build tool and create two different profiles: one for our daily coding which we will name dev and another one which we’ll be calling test-server that we’ll be used when building for our test server.

How to use Maven Profiles for Building Different Environments

These assumes that you have already know how to create a webapp project in maven, otherwise you can visit the following link:

How to Create Web Application using Maven and Netbeans

Creating Web Application using Maven in IntelliJ

In this example, we want to change the configuration for our database password since the password in test server is different from our local machine.

  1. Create New Configurations for Test Environment

    Create a new property file in your resources folder that contains our test server configurations eg. if you have application.properties, create a new file application.test.properties.
    application.properties

    jdbc.driverClassName = com.mysql.jdbc.Driver
    jdbc.url = jdbc:mysql://localhost:3306/example
    jdbc.username = root
    jdbc.password = root
    hibernate.dialect = org.hibernate.dialect.MySQLDialect
    hibernate.show_sql = false
    hibernate.format_sql = false
    

    application.test.properties

    jdbc.driverClassName = com.mysql.jdbc.Driver
    jdbc.url = jdbc:mysql://localhost:3306/example
    jdbc.username = root
    jdbc.password = Ghrsa912#
    hibernate.dialect = org.hibernate.dialect.MySQLDialect
    hibernate.show_sql = false
    hibernate.format_sql = false
    
  2. Configuring Profiles in pom.xml

    Next we edit our pom.xml add our profiles.
    We also add the jetty maven plugin in our dev profile since its only used in our local not in our test server.
    pom.xml


                dev


                            <groupId>org.apache.maven.plugins</groupId>
                            <artifactId>maven-compiler-plugin</artifactId>
                            3.0
                            
                                
                                    compile


                                ${jdk.version}
                                ${jdk.version}


                            <groupId>org.eclipse.jetty</groupId>
                            <artifactId>jetty-maven-plugin</artifactId>
                            9.3.8.v20160314
                            
                                <scanIntervalSeconds>10</scanIntervalSeconds>


                test-site
                
                    <finalName>profile-example</finalName>
                    
                        
                            <groupId>org.apache.maven.plugins</groupId>
                            <artifactId>maven-antrun-plugin</artifactId>
                            1.8
                            
                                
                                    compile
                                    
                                        run


                                            <delete file="${project.build.outputDirectory}/application.properties"/>
                                            <copy file="src/main/resources/application.test.properties"
                                                  tofile="${project.build.outputDirectory}/application.properties"/>
    
                                            <delete file="${project.build.outputDirectory}/application.test.properties"/>


                            <groupId>org.apache.maven.plugins</groupId>
                            <artifactId>maven-compiler-plugin</artifactId>
                            3.0
                            
                                
                                    compile


                                ${jdk.version}
                                ${jdk.version}


                            <groupId>org.apache.maven.plugins</groupId>
                            <artifactId>maven-war-plugin</artifactId>
                            2.6
                            
                                
                                    install


    Take note of the tasks inside the test-server profile. First we delete our application.properties in our build directory, then we copy application.test.properties to application.properties so that our new property file will consist the configs for our test server and lastly, we delete the application.test.properties to avoid confusion.

  3. Building the project

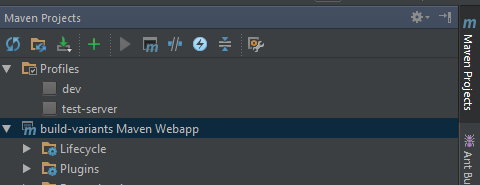
    If you are using Intellij, you can simply switch in different profile by just ticking the checkbox in Maven Projects Tab.

    maven profiles in intellij

    maven profiles in intellij


    and in Lifecycle, double click install to create the war file. Or if you don’t use Intellij, in cmd you can just run:

    mvn -Ptest-server install
    

    where test-server is the profile.

  4. Verifying

    Finally, to check if it correctly build the project, go to target/classes folder and open the application.properties and check if the configurations are correct. As simple as that, just create new profiles in maven when building different environments.

Share this tutorial!