Add Spring Security to Spring Boot
This tutorial will teach you how to add spring security to spring boot applications. This is a continuation of the tutorial Creating Simple Spring Boot Web Application. At the end of this tutorial, you can download the source code example using the link provided at the end.
How to Add Spring Security to Spring Boot Web Application
Add Spring Boot Starter Security Dependency
To add spring security to spring boot, first, we add the dependency spring-boot-starter-security.
<dependency>
    <groupId>org.springframework.boot</groupId>
    <artifactId>spring-boot-starter-security</artifactId>
</dependency>
Extending WebSecurityConfigureAdapter
Next, create a class that extends the WebSecurityConfigureAdapter. Add the annotation @EnableWebSecurity to the class to tell spring that this class is a spring security configuration.
Override the two overloaded methods configure(HttpSecurity) and configure(AuthenticationManagerBuilder).
The configure(HttpSecurity) defines the mapping of secured URLs or paths that will determine if the user can access specific pages.
The configure(AuthenticationmanagerBuilder) determines how the security will handle the retrieval of user information commonly in the database.
@EnableWebSecurity
public class WebSecurityConfiguration extends WebSecurityConfigurerAdapter {
    @Autowired
    private AuthenticationSuccessHandler authenticationSuccessHandler;

    @Override
    protected void configure(HttpSecurity httpSecurity) throws Exception {
        httpSecurity.authorizeRequests()
                .antMatchers("/", "/css/**", "/js/**", "/images/**").permitAll()
                .antMatchers("/user/**").hasAnyRole("USER", "ADMIN")
                .antMatchers("/admin/**").hasRole("ADMIN")
                .anyRequest().authenticated()
                .and()
                .formLogin()
                .loginPage("/")
                .loginProcessingUrl("/login")
                .failureUrl("/?login_error")
                .successHandler(authenticationSuccessHandler);
    }

    @Override
    protected void configure(AuthenticationManagerBuilder auth) throws Exception {
        auth.inMemoryAuthentication()
                .withUser("user").password("user").roles("USER")
                .and()
                .withUser("admin").password("admin").roles("ADMIN");
    }
}
The code inside the method configure(HttpSecurity) tells you the following:
- that any request for “/” or index or CSS and js and images are not secured and are all permitted.
- that any request with starting URL of “/user/” can only be viewed by user that has ROLE_USER or ROLE_ADMIN authorities.
- that any request with starting URL of “/admin/” can only be viewed by the user that has ROLE_ADMIN.
- if the user is not authenticated, then the user will be redirected to form the login page which is in the “/” URL.
- the loginProcessingUrl(“/login”) tells you that your form should have an action=’/login’.
- the failureUrl(“/?login_error”) means that if the username/password is incorrect, the user will be redirected to this page.
- the successHandler(authenticationSuccessHandler) is our own implementation of AuthenticationSuccessHandler interface so that we can redirect the user depending on its role.
Inside the method, configure(AuthenticationManagerBuilder), contains the information on how to retrieve the user information. In our case, we just create an inMemoryAuthentication with 2 users that have username and password to be user/user for ROLE_USER and admin/admin for ROLE_ADMIN.
In a real-life scenario, you may need to create your own implementation of UserDetailsService interface and add it to the AuthenticationManagerBuilder.
AuthenticationSuccessHanlder Implementation
Here, we create our own implementation of AuthenticationSuccessHandler that will be called if the user authenticated successfully. We can also add how the user will be redirected depending on its role.
public class AuthenticationSuccessHandlerImpl implements AuthenticationSuccessHandler {
    private static final SimpleGrantedAuthority ADMIN_AUTHORITY = new SimpleGrantedAuthority("ROLE_ADMIN");
    private RedirectStrategy redirectStrategy = new DefaultRedirectStrategy();

    @Override
    public void onAuthenticationSuccess(HttpServletRequest httpServletRequest,
                                        HttpServletResponse httpServletResponse,
                                        Authentication authentication) throws IOException, ServletException {

        Collection<? extends GrantedAuthority> authorities = authentication.getAuthorities();

        if (authorities.contains(ADMIN_AUTHORITY)) {
            redirectStrategy.sendRedirect(httpServletRequest, httpServletResponse, "/admin");
        } else {
            redirectStrategy.sendRedirect(httpServletRequest, httpServletResponse, "/user");
        }
    }
}
Bean Configurations
In order for our @Autowired annotation to work inside WebSecurityConfiguration class, we need to create the bean for our AuthenticationSuccessHandler implementation. The class should be annotated by @Configuration to tell spring that this is a configuration class.
@Configuration
public class BeanConfigurations {

    @Bean
    public AuthenticationSuccessHandler authenticationSuccessHandler() {
        return new AuthenticationSuccessHandlerImpl();
    }
}
Testing the Spring Security
Let’s now test our spring security in our spring boot application.
Creating the Controllers
We’ll create two controllers. The UserController and AdminController.
@Controller
@RequestMapping("/user")
public class UserController {

    @RequestMapping
    public String viewUserProfile() {
        return "user/profile";
    }
}
The viewUserProfile method will be called for any GET request in “/user” path. The “user/profile” that will be returned means that the view that will be displayed can be found in templates/user/profile.html. The same explanation for AdminController. Below is the code for AdminController.
@Controller
@RequestMapping("/admin")
public class AdminController {
    @RequestMapping
    public String viewManageUsers() {
        return "/admin/manage-users";
    }
}
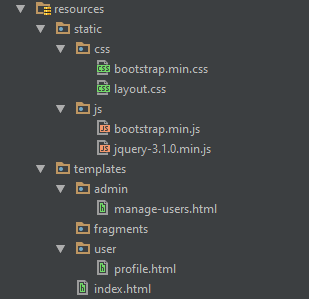
Creating the Views
Next, we create the HTML files for profile.html inside the user folder and manage-users.html inside the admin folder. Below is the folder structure for views in thymeleaf:
Run the Application
Finally, we can now run the application. Open Application.java and run the main method. Go to your browser and type localhost:8085/javapointers. This is the index page and the login page. Try to login using user/user and admin/admin and you will be redirected depending on your credentials. Accessing the /user or /admin URL without logging in will redirect the user to the login page.
You can download the source code on how to add spring security to spring boot using this link
Next tutorial is how to Create WAR file in Spring Boot