How to use Border Layout in Java
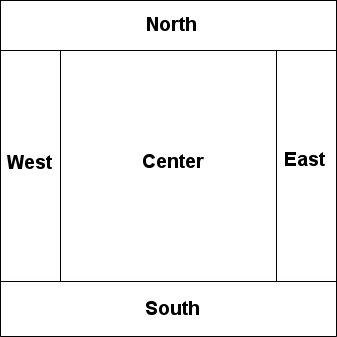
In our previous post, we discussed the Flow Layout. Another layout manager that commonly used is the Border Layout. The Border Layout in Java places its components in 5 places/directions: North, East, South, West, and Center.
Example of Border Layout in Java
package com.javapointers.javase;

import java.awt.BorderLayout;
import javax.swing.JButton;
import javax.swing.JFrame;

public class BorderLayoutTest {

    JButton btnNorth, btnEast, btnWest, btnSouth, btnCenter;
    JFrame frame;

    public BorderLayoutTest() {
        btnNorth = new JButton("North");
        btnEast = new JButton("East");
        btnWest = new JButton("West");
        btnSouth = new JButton("South");
        btnCenter = new JButton("Center");

        frame = new JFrame();
        frame.setSize(500, 400);
        frame.setLayout(new BorderLayout());
        frame.add(btnNorth, BorderLayout.NORTH);
        frame.add(btnEast, BorderLayout.EAST);
        frame.add(btnWest, BorderLayout.WEST);
        frame.add(btnSouth, BorderLayout.SOUTH);
        frame.add(btnCenter, BorderLayout.CENTER);
        frame.setDefaultCloseOperation(JFrame.EXIT_ON_CLOSE);
        frame.setVisible(true);
    }

    public static void main(String args[]) {
        BorderLayoutTest test = new BorderLayoutTest();
    }
}
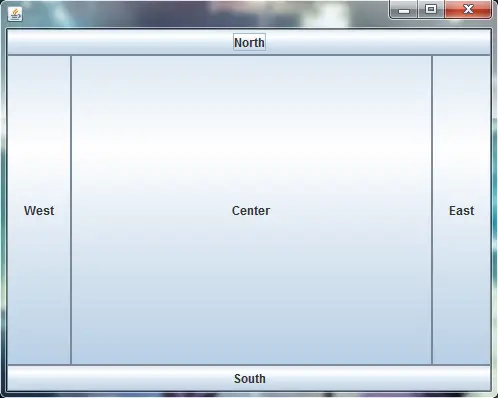
Running the program will show you this:
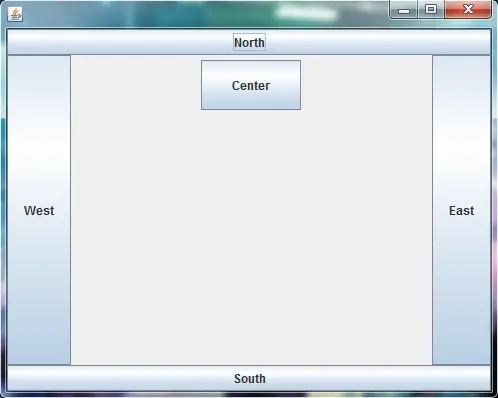
Take note that the default is the component will take the entire space of the cell. For example, if you want our center button to be 100×50 only in size, we can then place first the button in a JPanel and add the panel to the JFrame. Let’s change our example and add these lines:
btnCenter.setPreferredSize(new Dimension(100,50));
        JPanel panel = new JPanel();
        panel.add(btnCenter);
then change this line:
frame.add(btnCenter, BorderLayout.CENTER);
to:
frame.add(panel, BorderLayout.CENTER);
giving as an output of this:
The next tutorial will be about Grid Layout which is another form of Layout Manager.