Spring Security Remember Me Example
There are two methods in Spring Security for Remember Me service. One is using cookie in browser and the other one is using persistent. In this Spring Security Remember Me example, we will be using the persistent method which is more secured.
Spring Security Remember Me Example
These are the highlights of the example:
1. Create Persistence Table in database
2. Add Remember Me configuration in spring security context
3. Add Remember Me in your HTML
Create Persistence Table
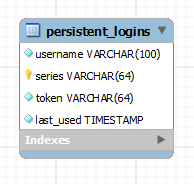
Spring Security uses persistent_logins table use remember me. These table is constant so you don’t need to change the table names or the columns. Just add it to your database. Below is the definition of the persistent_logins table:
CREATE TABLE IF NOT EXISTS `db_name`.`persistent_logins` (
  `username` VARCHAR(100) NOT NULL,
  `series` VARCHAR(64) NOT NULL,
  `token` VARCHAR(64) NOT NULL,
  `last_used` TIMESTAMP NOT NULL,
  PRIMARY KEY (`series`));
where db_name is your database name. This will create the below ERD:

Configure Spring Security Context
After creating the database table, we now define the remember me service to our spring security context. Inside your spring security definition, add the remember me configs:
<security:remember-me remember-me-parameter="remember-me"
                      remember-me-cookie="remember-me"
                      token-validity-seconds="604800"
                      data-source-ref="dataSource"/>
Here are the attribute definitions:
- remember-me-parameter – this is the parameter name of your input tag in your html. Basically you will use an input type checkbox here.
- remember-me-cookie – the name of the cookie that will be saved in browser
- token-validity-seconds – determines the expiration time of the cookie in seconds
- data-source-ref – this is the id of your bean definition of your datasource eg. your org.springframework.jdbc.datasource.DriverManagerDataSource
If you are also using a custom authentication success handler, you need to add the attribute authentication-success-handler-ref with its value as your bean definition of your custom authentication success handler. Read more about Spring Custom AuthenticationSuccessHandler Example
Add remember me in your HTML
Lastly, add the remember me input tag in your login html.
Inside your login form, add the input tag of your remember me, example:
<input id="remember" name="remember-me" type="checkbox">
    <label for="remember">Remember Me</label>
</input>
Take note the attribute name is the one that we defined in our spring security context.
Then test it and if you have checked this input and logged in, it should add data to your persistent_table and save cookie to your browser.